Lazy 환경설정
기존의 yacs 기반 환경설정 시스템은 기본적인 표준 기능들을 제공합니다. 그러나 많은 새로운 프로젝트에서 사용하기에 유연성이 부족합니다. 이에 대한 대안으로 좀 더 유연한 환경설정 시스템을 개발해 detectron2를 비롯한 여러 복잡한 프로젝트와 함께 사용할 수 있도록 제공합니다.
Python 문법
환경설정 객체는 여전히 dictionary입니다. dictionary를 정의하기 위해 Yaml을 사용하지 않고 Python에서 직접 dictionary를 만듭니다. 이로써 Yaml에 없는 다음과 같은 기능을 사용자에게 제공합니다.
Python을 사용하여 dictionary를 쉽게 조작(추가 및 삭제)할 수 있습니다.
간단한 산술 작성 및 함수 호출을 할 수 있습니다.
다른 데이터 타입/객체를 사용할 수 있습니다.
우리에게 친숙한 Python import 구문을 사용해 다른 환경설정 파일을 가져오거나 구성합니다.
Python 환경설정 파일은 아래와 같이 로드할 수 있습니다.
# config.py:
a = dict(x=1, y=2, z=dict(xx=1))
b = dict(x=3, y=4)

# my_code.py:
from detectron2.config import LazyConfig
cfg = LazyConfig.load("path/to/config.py")  # omegaconf의 dictionary
assert cfg.a.z.xx == 1
LazyConfig.load 이후, cfg 는 환경설정 파일의
전역 범위에 정의된
모든 dictionary를 포함하는 dictionary가 됩니다. 참고로,
모든 dictionary는 로드 과정에서 omegaconf 환경설정 객체로 바뀝니다. 따라서, access syntax 및 interpolation 과 같은 omegaconf 고유 기능을 사용할 수 있습니다.
config.py의 절대경로 import는 일반 Python과 동일하게 동작합니다.상대경로 import는 환경설정 파일의 dictionary만 가져올 수 있습니다. 이는 그저 LazyConfig.load_rel에 대한 신택스 슈거(syntax sugar)입니다.
__init__.py없이 상대 경로에서 Python 파일을 로드할 수 있습니다.
LazyConfig.save 를 통해 환경설정 객체를 yaml에 저장할 수 있습니다. 참고로 직렬화할 수 없는 객체가 환경설정 파일(예: 람다)에 나타나는 등의 경우에는 위 방법을 사용할 수 없습니다. 유연성을 위해 저장 가능한 형태를 희생할지 선택은 사용자의 몫입니다.
재귀적 인스턴스화(Recursive Instantiation)
LazyConfig 시스템은 dictionary를 통해 함수/클래스에 대한 호출을 설명하는 재귀적 인스턴스화 패턴을 많이 사용합니다. 이 dictionary의 구성은 다음과 같습니다.
“module.submodule.class_name” 등 호출 가능한 객체(callable)의 경로를 저장하는 “_target_” 키.
위 객체에 전달할 argument를 나타내는 키로, argument 자체는 재귀적 인스턴스화를 통해 정의할 수 있습니다.
이러한 dictionary를 만드는 데 도움이 되도록 헬퍼 함수 LazyCall 를 제공합니다.
아래의 코드는 LazyCall 를 사용합니다.
from detectron2.config import LazyCall as L
from my_app import Trainer, Optimizer
cfg = L(Trainer)(
  optimizer=L(Optimizer)(
    lr=0.01,
    algo="SGD"
  )
)
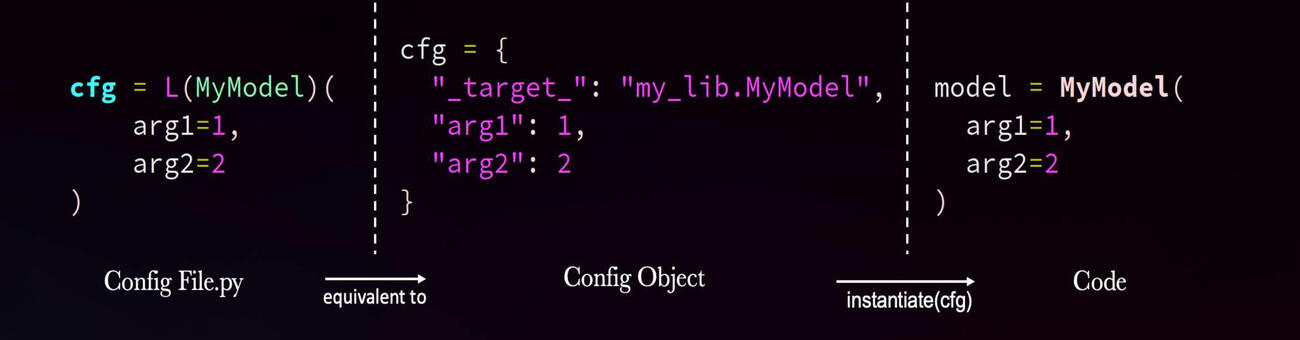
이는 다음과 같은 dictionary를 생성합니다.
cfg = {
  "_target_": "my_app.Trainer",
  "optimizer": {
    "_target_": "my_app.Optimizer",
    "lr": 0.01, "algo": "SGD"
  }
}
이렇게 객체를 dictionary로 표현함으로써 일반적인 instantiate 함수는 이를 실제 객체로 바꿀 수 있습니다. 예:
from detectron2.config import instantiate
trainer = instantiate(cfg)
# 이는 아래와 같은 의미입니다.
# from my_app import Trainer, Optimizer
# trainer = Trainer(optimizer=Optimizer(lr=0.01, algo="SGD"))
이 패턴은 아래 예시와 같이 매우 복잡한 객체를 잘 설명합니다.
재귀적 인스턴스화로 표현된 Full Mask R-CNN (클릭하여 확장)
1 2 3 4 5 6 7 8 9 10 11 12 13 14 15 16 17 18 19 20 21 22 23 24 25 26 27 28 29 30 31 32 33 34 35 36 37 38 39 40 41 42 43 44 45 46 47 48 49 50 51 52 53 54 55 56 57 58 59 60 61 62 63 64 65 66 67 68 69 70 71 72 73 74 75 76 77 78 79 80 81 82 83 84 85 86 87 88 89 90 91 92 93 | from detectron2.config import LazyCall as L from detectron2.layers import ShapeSpec from detectron2.modeling.meta_arch import GeneralizedRCNN from detectron2.modeling.anchor_generator import DefaultAnchorGenerator from detectron2.modeling.backbone.fpn import LastLevelMaxPool from detectron2.modeling.backbone import BasicStem, FPN, ResNet from detectron2.modeling.box_regression import Box2BoxTransform from detectron2.modeling.matcher import Matcher from detectron2.modeling.poolers import ROIPooler from detectron2.modeling.proposal_generator import RPN, StandardRPNHead from detectron2.modeling.roi_heads import ( StandardROIHeads, FastRCNNOutputLayers, MaskRCNNConvUpsampleHead, FastRCNNConvFCHead, ) model = L(GeneralizedRCNN)( backbone=L(FPN)( bottom_up=L(ResNet)( stem=L(BasicStem)(in_channels=3, out_channels=64, norm="FrozenBN"), stages=L(ResNet.make_default_stages)( depth=50, stride_in_1x1=True, norm="FrozenBN", ), out_features=["res2", "res3", "res4", "res5"], ), in_features="${.bottom_up.out_features}", out_channels=256, top_block=L(LastLevelMaxPool)(), ), proposal_generator=L(RPN)( in_features=["p2", "p3", "p4", "p5", "p6"], head=L(StandardRPNHead)(in_channels=256, num_anchors=3), anchor_generator=L(DefaultAnchorGenerator)( sizes=[[32], [64], [128], [256], [512]], aspect_ratios=[0.5, 1.0, 2.0], strides=[4, 8, 16, 32, 64], offset=0.0, ), anchor_matcher=L(Matcher)( thresholds=[0.3, 0.7], labels=[0, -1, 1], allow_low_quality_matches=True ), box2box_transform=L(Box2BoxTransform)(weights=[1.0, 1.0, 1.0, 1.0]), batch_size_per_image=256, positive_fraction=0.5, pre_nms_topk=(2000, 1000), post_nms_topk=(1000, 1000), nms_thresh=0.7, ), roi_heads=L(StandardROIHeads)( num_classes=80, batch_size_per_image=512, positive_fraction=0.25, proposal_matcher=L(Matcher)( thresholds=[0.5], labels=[0, 1], allow_low_quality_matches=False ), box_in_features=["p2", "p3", "p4", "p5"], box_pooler=L(ROIPooler)( output_size=7, scales=(1.0 / 4, 1.0 / 8, 1.0 / 16, 1.0 / 32), sampling_ratio=0, pooler_type="ROIAlignV2", ), box_head=L(FastRCNNConvFCHead)( input_shape=ShapeSpec(channels=256, height=7, width=7), conv_dims=[], fc_dims=[1024, 1024], ), box_predictor=L(FastRCNNOutputLayers)( input_shape=ShapeSpec(channels=1024), test_score_thresh=0.05, box2box_transform=L(Box2BoxTransform)(weights=(10, 10, 5, 5)), num_classes="${..num_classes}", ), mask_in_features=["p2", "p3", "p4", "p5"], mask_pooler=L(ROIPooler)( output_size=14, scales=(1.0 / 4, 1.0 / 8, 1.0 / 16, 1.0 / 32), sampling_ratio=0, pooler_type="ROIAlignV2", ), mask_head=L(MaskRCNNConvUpsampleHead)( input_shape=ShapeSpec(channels=256, width=14, height=14), num_classes="${..num_classes}", conv_dims=[256, 256, 256, 256, 256], ), ), pixel_mean=[103.530, 116.280, 123.675], pixel_std=[1.0, 1.0, 1.0], input_format="BGR", ) |
재사용된 객체, 메소드 호출 등 dictionary로 간단히 설명할 수 없는 객체나 로직도 있습니다. 이들을 재귀적 인스턴스화 패턴과 함께 사용하려면 약간의 리팩토링이 필요할 수 있습니다.
모델 Zoo의 LazyConfigs 사용
LazyConfig 시스템을 사용하여 모델 zoo 다음과 같이 몇 가지 환경설정을 제공합니다.
Detectron2를 설치한 후 모델 zoo API의 model_zoo.get_config 를 통해 로드할 수 있습니다.
학습 스크립트와 호환이 되기만 한다면, 이를 참고해 여러분의 프로젝트에 대한
커스텀 환경설정 구조/필드를 자유롭게 정의할 수 있습니다.
그럼에도 불구하고 모델 zoo 환경설정은 일관성을 위해 여전히 몇 가지 간단한 규칙을 따릅니다.
예를 들어, cfg.model 은 모델 객체를 정의하고, cfg.dataloader.{train,test} 는 데이터로더 객체를 정의하고,
cfg.train 은 키-밸류 포맷의 학습 옵션을 포함합니다.
환경설정 구조를 시각화할 때 print() 보다 더 좋은 방법은 다음과 같습니다.
from detectron2.model_zoo import get_config
from detectron2.config import LazyConfig
print(LazyConfig.to_py(get_config("COCO-InstanceSegmentation/mask_rcnn_R_50_FPN_1x.py")))
출력을 확인하면 변경하고 싶은 옵션을 더 쉽게 찾을 수 있습니다. 예를 들어,
배치(batch) 크기는 dataloader.train.total_batch_size, 기본 학습률(learning rate)은 optimizer.lr 입니다.
모델 zoo 환경설정으로 학습/평가를 하기 위한 학습 스크립트 tools/lazyconfig_train_net.py를 참고용으로 제공합니다. 더불어 커맨드라인 값 재정의(override)를 지원하는 방법도 안내합니다.
새 시스템의 강력함과 유연성을 확인하기 위해 간단한 환경설정 파일 으로 ImageNet 분류(classification)를 위한 feature가 없는 detectron2에게 torchvision의 ImageNet 분류 모델을 학습시킵니다. 이를 참고해 다른 딥러닝 task에서도 detectron2를 사용할 수 있습니다.
요약
재귀적 인스턴스화를 사용하여 객체를 생성하면
cfg 가 오직 instantiate 에만 전달되므로, 거대한 환경설정이 여러 위치에 전달되지 않습니다.
이는 다음과 같은 이점을 갖습니다.
non-intrusive: 생성되는 객체가 환경설정 방식에 구애받지 않는 일반 Python 함수/클래스입니다. 다른 라이브러리에서도 가져올 수 있습니다. 예를 들어,
{"_target_": "torch.nn.Conv2d", "in_channels": 10, "out_channels": 10, "kernel_size": 1}는 conv 계층(layer)을 정의합니다.어떤 함수/클래스가 호출되고 어떤 argument를 사용하는지 명확합니다.
cfg에는 사전에 정의된 키나 구조가 필요하지 않습니다. 그저 유효한 코드로 변환되기만 하면 됩니다. 이것은 훨씬 더 많은 유연성 을 제공합니다.이전 방식과 마찬가지로 여전히 거대한 dictionary를 argument로 전달할 수 있습니다.
재귀적 인스턴스화와 Python 문법은 독립적이므로, 반드시 함께 사용하지 않아도 됩니다. 그러나 함께 사용하면 환경설정 파일이 실행될 코드와 매우 유사한 형태가 됩니다.
그러나 환경설정 파일은 dictionary를 정의할 뿐이며 합성 및 재정의를 통해
추가로 쉽게 조작할 수 있습니다.
해당 코드는 나중에 instantiate 가 호출될 때만 실행됩니다. 어떻게 보면
나중에 필요한 순간 “lazy하게 실행”되는 “편집 가능한 코드”를 환경설정 파일에 작성하고 있는 것입니다.
이러한 이유에서 이 시스템을 “LazyConfig”라고 부르는 것입니다.